
With Gratitude…Some of Our Favorite Thanksgiving Recipes
Some of our Favorite Thanksgiving (or anytime) Recipes
Fresh Apple Pie – Maralee Tiffin

7 medium Honeycrisp, Granny Smith, Jonathan, or Pink Lady
1/2 c Dark Brown Sugar, packed
3 Tbs all-purpose flour
1 tsp Cinnamon1/4 tsp Nutmeg (freshly ground)
1/8 tsp Salt
1-2 Tbsp Dark Rum (optional, or substitute 2 Tbsp water)
2 Tbsp Butter
1 Box Pillsbury Ready Crust or use Butter and Vodka Pie Crust for Free Form Rustic Pie (directions below)
Directions for baking in Pie Dish:
Preheat oven to 425 degrees, position rack in the center. Allow Ready Crust to sit at room temperature 15 minutes. Core apples, peel and slice no more than 1⁄4 inch thick. In a small bowl combine sugar, flour, spices, and salt. Melt butter in a large pot over medium-low heat, add sugar mixture and rum, cook until sugar is dissolved and mixture is thick and bubbly. Add apples and toss to evenly coat. Cover and reduce the heat to low, simmer 10-15
minutes so that the apples release their juices and shrink somewhat. Cool to room temperature.
Meanwhile, unfold each ready crust onto wax paper. Cover with an additional sheet of wax paper so that the crust is between
two sheets. Roll smooth with a rolling pin and spread so that the crust will fit a 9” deep dish pie plate. Sprinkle one side lightly
with 1 tsp flour, spread with fingers, and place flour side down in a pie plate. Arrange apples onto the bottom crust, cover with
the top crust and crimp the edges into the desired design. Cut a few slits into the center of the crust.
Bake at 425 for 25 minutes. Remove foil (see TIP) and bake an additional 10-15 minutes or until crust is crisp and evenly
browned. Allow to cool 20-30 minutes. Serve warm with a scoop of good vanilla ice cream.
TIP: Tear a long strip of tin foil, long enough to encircle the pie dish, and fold it in half lengthwise. Wrap around the pie plate and crimp
to cover the outer edges, leaving the center open. This prevents the crust edges from burning.
NOTE: Why do we cook the apples stovetop first? This releases their juices and coats the apples with this wonderful
caramelly sauce. Precooking the apples shrinks them avoiding the hollow dome the crust forms above the apples. Granny
Smith apples tend to be dryer requiring the liquid used when cooking. Liquid can be skipped if using Honeycrisp, but a
little rum imparts delightful flavor!
Directions for Free Form Rustic Pie:
Prepare Vodka & Butter Pie Crust recipe. Form into a disk, wrap in plastic and refrigerate for 1 hour up to 2 days. Allow to
come to room temperature 15 minutes before rolling out onto parchment paper into a 16 inch round. Arrange the cooled
apples into an 8” circle in the center forming a dome, leaving 3-4 inch border of pastry dough clear. Gently fold dough over
apples, leaving the center open. Sprinkle with Turbinado (Raw) sugar. Carefully transfer parchment to the preheated
baking stone and bake 40-45 minutes until golden brown. Serve warm with good vanilla ice cream.
Butter & Vodka Pie Crust
1 1⁄2 c All Purpose Flour
1⁄2 tsp Salt
10 Tbsp Cold Butter (Kerigold) cut into 1⁄2 inch cubes
5 Tbsp Cold Vodka (best from freezer)
Combine flour and salt in a food processor, pulse to mix. Add cold butter, pulse until mealy. Add 3 Tbsp cold vodka, pulse to combine. Continue adding one Tbsp vodka at a time until the dough forms a ball or can be pressed together. Remove and form into a disc, wrap with plastic, and refrigerate 1 hour. To roll out, let stand at room temperature 15 minutes to soften. Roll out onto floured parchment to a 14–16″ round. Cover with parchment, wrap it around your rolling pin, and refrigerate 30 minutes. This crust can be used top and bottom of an 8″ pie, or free-form tarts. If wrapped well, you can store in the refrigerator 3-4 days or freeze up to 3 months.
When ready to use, fill with your desired ingredients, bake at 425 degrees for 35-40 minutes until golden brown.
Note: If you freeze the flour, salt, and butter mixture for 15 minutes, the dough will be cold enough to immediately roll out after adding the vodka. The vodka guarantees a flaky crust, as it does not activate the glutens in the flour and evaporates during baking, leaving only a delicious butter flavor! Transferring rolled-out dough to a preheated pizza stone ensures a crispier bottom with a free-form rustic pie.
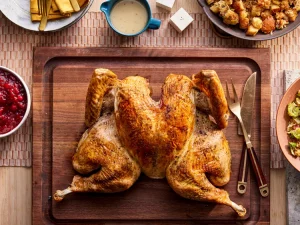
Crisp-Skinned Spatchcocked (Butterflied) Roast Turkey With Gravy
from SeriousEats.com
Greg’s favorite method to roast a whole turkey or chicken is to spatchcock, dry brine, whether in the oven or on the grill!
Spatchcocking turkey cooks more evenly and more quickly than non-butterflied versions, for stunningly crisp skin and perfectly cooked white and dark meat.
For best results, we recommend dry-brining your turkey by following the instructions here. If dry-brining, you can omit any additional salt added to the turkey in step two.
 See the link below to SeriousEats.com for the complete recipe, along with video instructions:
 See the link below to SeriousEats.com for the complete recipe, along with video instructions:
https://www.seriouseats.com/butterfiled-roast-turkey-with-gravy-recipe
Turkey Troubles: How to Cook a Turkey Quickly and Evenly
We all know the basic problem with roasting a whole turkey or chicken, right? It lies in the fact that while leg meat, with its connective tissue, fat, and deep color should be cooked to at least 165°F (74°C) to be palatable, lean breast meat will completely dry out much above 150°F (66°C).*
What Is Spatchcocking?
Spatchcocking your bird—that is, cutting out the backbone and laying it flat—solves all of these problems, and then some. The basics for butterflying a turkey couldn’t be simpler.
All you’ve got to do is cut out the turkey’s back with a pair of solid poultry shears. Start by patting the turkey dry with paper towels, then place it breast-side down on the cutting board. Holding it firmly with one hand, make a cut along one side of the backbone, starting down near where the thighs meet the tail.
Why Spatchcock a Turkey?
Advantage 1: Flat Shape = Even Cooking
By laying the bird out flat and spreading the legs out to the sides, what was once the most protected part of the bird (the thighs and drumsticks) are now the most exposed. This means that they cook faster—precisely what you want when your goal is cooking the dark meat to a higher temperature than light meat.
As a bonus, it doesn’t take up nearly as much vertical space in your oven, which means that if you wanted to, you could even cook two birds at once. This is a much better strategy for moist meat than trying to cook one massive bird.
Advantage 2: All Skin on Top = Juicier Meat and Crisper Skin
A regular turkey can be approximated as a sphere with meat inside and skin on the outside. Because it’s resting on top of a roasting pan or baking sheet, one side of that sphere will always cook more than the other.
A spatchcocked turkey, on the other hand, resembles a cuboid, in which the top surface is skin and the volume is meat. This leads to three end results. First, all of the skin is exposed to the full heat of the oven at the same time. There is no skin hiding underneath, no underbelly to worry about. Secondly, there is ample room for rendering fat to drip out from under the skin and into the pan below. This makes for skin that ends up thinner and crisper in the end.
Finally, all of that dripping fat bastes the meat as it cooks, helping it to cook more evenly, and creating a temperature buffer, protecting the meat from drying out.
Advantage 3: Thinner Profile = Faster Cooking
A normal roast turkey can take several hours to cook through at an oven temperature of around 350°F or so. Try and increase that heat, and you end up scorching the skin before the meat has had a chance to cook through.
With a spatchcocked turkey and its slim profile, this is not a problem. You can blast it at 450°F and it’ll cook through in about 80 minutes without even burning the skin. In fact, you want to cook it at this temperature to ensure that the legs and breasts end up cooking at the same time (lower heat leads to a lower differential in the internal temperature between hot and cool spots), and that the skin crisps up properly.
It’s a time savings of about 50%! If I added up all the time I could have saved in Thanksgivings past using this method, I could perhaps—dare I say it—rule the world?
Advantage 4: Turkey Backbones = Better Gravy
It’s always possible to make gravy with nothing but canned chicken stock and drippings, but that gravy is so much better when you have some real bones and meat to work with. Normally, that means using the turkey neck and giblets to flavor the broth while the turkey roasts. You can still do that. But this time, you can add the entire turkey’s back to the mix, resulting in a far more flavorful broth with which to make your gravy.
The Drawbacks to Spatchcocking
To be honest, there aren’t many drawbacks to the method. For some folks, the primary complaint will be that a spatchcocked turkey simply looks wrong. It arrives at the table with its legs splayed open in the most vulgar fashion. To those folks, my advice would be to carve it in the kitchen, following our handy video below…
Crisp-Skinned Spatchcocked (Butterflied) Roast Turkey With Gravy
Ingredients
- 3 large onions, roughly chopped (about 1 1/2 quarts)
- 3 large carrots, peeled and roughly chopped (about 1 quart)
- 4 stalks celery, roughly chopped (about 1 quart)
- 12 thyme sprigs
- 1 whole turkey (12 to 14 pounds total), butterflied as per the instructions above, backbone, neck, and giblets reserved
- 2 tablespoons vegetable oil, divided
- Kosher salt and freshly ground black pepper
- 1 1/2 quarts low-sodium homemade or store-bought chicken or turkey broth
- 2 bay leaves
- 3 tablespoons unsalted butter
- 4 tablespoons all-purpose flour
Directions
- Adjust oven rack to middle position and preheat oven to 450°F (230°C). Line a rimmed baking sheet or broiler pan with aluminum foil. Scatter 2/3rds of onions, carrots, celery and thyme sprigs across bottom of pan. Place slotted broiler rack or wire rack directly on top of vegetables.
- Pat turkey dry with paper towels and rub on all surfaces with 1 tablespoon oil. Season liberally on all surfaces with salt and black pepper. (If using a brined, salted, or Kosher turkey, omit salting step; see note.) Tuck wing tips behind back. Place turkey on top of rack, arranging so that it does not overlap the edges, pressing down on the breast bone to flatten the breasts slightly.
- Transfer turkey to oven and roast, rotating occasionally, until an instant read thermometer inserted into the deepest part of the breast registers 150°F (66°C), and the thighs register at least 165°F (74°C), about 80 minutes.
- While turkey roasts, make the gravy. Roughly chop the neck, backbone, and giblets. Heat remaining 1 tablespoon oil in a 3-quart saucepan over high heat until shimmering. Add chopped turkey parts and cook, stirring occasionally, until lightly browned, about 5 minutes. Add remaining onions, carrots, and celery and continue to cook, stirring occasionally, until vegetables start to soften and brown in spots, another 5 minutes. Add chicken or turkey stock, remaining thyme, and bay leaves. Bring to a boil and reduce to a bare simmer. Allow to cook 45 minutes, then strain through a fine-mesh strainer into a 2-quart liquid measuring cup and discard solids. Skim off any fat from the surface of the broth.
- Melt butter over medium-high heat in a 2-quart saucepan. Add flour and cook, stirring constantly until flour is golden brown, about 3 minutes. Whisking constantly, add broth in a thin, steady stream until it is all incorporated. Bring to a boil, reduce to a simmer, and cook until reduced to about 1 quart, about 20 minutes longer. Season to taste with salt and pepper, cover, and keep gravy warm.
- When turkey is cooked, remove from oven and transfer rack to a new baking sheet. Allow to rest at room temperature for 20 minutes before carving. Carefully pour any collected juices from out of the roasting pan through a fine-mesh strainer into a liquid measuring cup. Skim off excess fat and discard. Whisk juices into gravy.
- Carve turkey and serve with gravy.
Special Equipment
Two rimmed baking sheets or one baking sheet and one broiler pan; aluminum foil; wire rack; poultry shears; instant-read thermometer, fine-mesh strainer, 2-quart liquid measuring cup, 2-quart saucepan, whisk.
Notes
For best results, we recommend dry-brining your turkey by following the instructions here. If dry-brining, you can omit any additional salt added to the turkey in step two.
Read More
- Video: How to Cook a Spatchcock Turkey (the Fastest, Easiest, Best Way to Cook a Thanksgiving Bird)
- The Food Lab’s Definitive Guide to Buying, Prepping, Cooking, and Carving Your Holiday Turkey
- The Serious Eats Guide to Carving Turkey
- The Best Simple Roast Turkey With Gravy Recipe
- Easy Stuffed Roast Turkey With Giblet Gravy Recipe
- Porchetta-Flavored Spatchcocked Turkey Recipe
Apricot-Glazed Carrots
A Favorite Always Requested on Thanksgiving
from Colorado Cache Cookbook by The Junior League of Denver
https://denver.jl.org/cookbooks/

Apricot-Glazed Carrots
4-6 servings
2 pounds carrots, cut on the diagonal (or we usually use 2 pounds of baby carrots)
3 tablespoons butter
1/3 cup apricot preserves
1/4 teaspoon ground nutmeg
1/4 teaspoon salt
1/2-1 teaspoon freshly grated orange peel
2 teaspoons fresh lemon juice
parsley for garnish
Cook scraped and cut carrots in salted water until just tender, about 20 minutes. Drain. Melt butter and stir in preserves until blended. Add nutmeg, salt, orange peel, and lemon juice. Toss carrots with apricot mixture until well coated. Garnish with parsley and serve at once. Note: Good with poultry or pork.
25 Best Thanksgiving Side Dishes

From one of our favorite recipe resources, ONCE UPON A CHEF with Jen Segal, has classics to fresh new favorites, these Thanksgiving side dishes are the kind everyone goes back for seconds of.
https://www.onceuponachef.com/recipes/25-best-thanksgiving-side-dishes.html

More Recipes to be uploaded and posted soon!
